Network Security - Part 1: Setting Up Your Environment
A few months ago, I embarked on a journey to learn more about the fundamentals of network security. This is the first of a series of technical blog posts where I will try to cover some of the tools and techniques I learned along the way: network and host-based firewalls, web proxies, or intrusion detection systems among others.
Network security is not a new field by any means. Quite the opposite, most of these tools have been around for a long time. However, the goal of this series is to give you a high-level overview of how these components fit together, as well as a platform for expanding your skills and knowledge should you decide to take it to the next level.
And what better platform than having your own lab? A virtual lab is exactly what we are going to build today. At the end of this post you should have an environment similar to this:

Hardware requirements
We will need to run multiple virtual machines at the same time, therefore memory will probably be the most important factor to consider when choosing your hardware. I recommend the following:
- RAM: at least 8GB
- Hard Disk: at least 20GB of free disk space
- CPU: any modern processor should do the job
Getting the software
We will need the following software components:
| Component | Software | Download Page |
|---|---|---|
| Virtualization Platform | VirtualBox | https://www.virtualbox.org |
| Router/Firewall | pfSense | https://www.pfsense.org/download |
| Server OS | Ubuntu Server 16.04.3 | https://www.ubuntu.com/download/server |
| Client OS | Ubuntu Desktop 16.04.3 | https://www.ubuntu.com/download/desktop |
I would assume that you already have VirtualBox installed on the host machine and that you know how to use an SSH client such us Putty or mRemoteNG (my preferred option if you are running Windows).
You will need to download the ISO files for the operating systems.
Creating the virtual networks
First. make sure to check out the official VirtualBox documentation to understand each networking mode:
https://www.virtualbox.org/manual/ch06.html
Internet
We will use a NAT Network adapter to simulate an un-trusted or external network. In the real world this will be the Internet, also known as WAN.
To create this network you can run the following command:
VBoxManage.exe natnetwork add --netname nslInternet --network "192.168.15.0/24" --enable --dhcp off
You can also use the VirtualBox GUI (File > Preferences > Networks > Nat Networks):

Notice that the DHCP server will be left disabled since DHCP is used for internal networks only.
Internal Network
We will create an internal adapter to mimic our corporate network (172.16.2.0/24), also known as the Intranet. Internal adapters are created by VirtualBox when needed (i.e.: when a VM is configured to used one).
Management Network
The last network is a Host-Only network that will allow us to connect to any VM from the hypervisor host. In the real world, this is a trusted network used by admins and network engineers to connect to networking equipment an other managed devices.
Run the following commands to create the host-only network (172.16.1.0/24) and assign an IP address (172.16.1.2) to the hypervisor host:
VBoxManage.exe hostonlyif create VBoxManage.exe hostonlyif ipconfig "VirtualBox Host-Only Ethernet Adapter" --ip 172.16.1.2 --netmask 255.255.255.0
*Note: the network name is automatically chosen by VirtualBox, so make sure you use the right one when running the second command to assign the IP.
If you prefer to use the VirtualBox GU, go to File > Preferences > Networks > Host-only Networks:

Building the Virtual Machines
There are six different hosts (one physical host, or hypervisor, and five virtual machines) in the network diagram:
- Hypervisor Host : this is your local machine, where VirtualBox is running.
- pfSense Router (nslpfSense): the router is connected to all three networks and its main purpose is to route and filter traffic communicating accross subnets.
- Monitoring Server (nslMonServer): this is the VM that will host our network monitoring services (IDS, SIEM, etc…).
- Web Server (nslWebServer): this is the VM that will be running our Apache web server.
- Remote Client (nslClient): endpoint connected to the untrusted network.
- Local Client (nslClient): endpoint connected to the internal network.
To avoid creating unnecessary VMs and save some memory we will use a single client VM (nslClient) with two Network Interface Cards (NICs). Thus, we only need to create four virtual machines.
pfSense Router
You can use this little PowerShell script to create the VM from the command-line (Make sure to update the variables according to your environment and ISO version):
$StorageFolder="D:\VirtualBox Storage" $ISOFile="D:\ISO\pfSense-CE-2.4.2-RELEASE-amd64.iso" $HostOnlyNetwork="VirtualBox Host-Only Ethernet Adapter" #Create the VM VBoxManage.exe createvm --name nslpfSense --ostype "FreeBSD\_64" --register #Set RAM VBoxManage.exe modifyvm nslpfSense --memory 512 --cpus 1 #Create and attach hard disk VBoxManage.exe createhd --filename "$StorageFolder\nslpfSense\nslpfSense.vdi" --size 5120 --format VDI --variant Fixed VBoxManage.exe storagectl nslpfSense --name "SATA Controller" --add sata VBoxManage.exe storageattach nslpfSense --storagectl "SATA Controller" --port 0 --device 0 --type hdd --medium "$StorageFolder\nslpfSense\nslpfSense.vdi" #Attach the ISO file VBoxManage.exe storagectl nslpfSense --name "IDE Controller" --add ide VBoxManage.exe storageattach nslpfSense --storagectl "IDE Controller" --port 1 --device 0 --type dvddrive --medium "$ISOFile" #Disable USB and audio VBoxManage.exe modifyvm nslpfSense --usb off --audio none #Setup network interfaces VBoxManage.exe modifyvm nslpfSense --nic1 natnetwork --nat-network1 nslInternet VBoxManage.exe modifyvm nslpfSense --nic2 hostonly --hostonlyadapter2 "$HostOnlyNetwork" VBoxManage.exe modifyvm nslpfSense --nic3 intnet --intnet3 nslInternal
Start the VM from the GUI and go through the pfSense installation wizard. Feel free to use the default installation values.
Power off the VM at the end of the installation process and run these clean up commands:
#Boot from hard disk VBoxManage.exe modifyvm nslpfSense --boot1 disk --boot2 none --boot3 none #Detach ISO file VBoxManage.exe storageattach nslpfSense --storagectl "IDE Controller" --port 1 --device 0 --type dvddrive --medium none VBoxManage.exe storagectl nslpfSense --name "IDE Controller" --remove
Configure the Network Interfaces
Start the nslpfSense VM again. This time , you will be presented with the pfSense configuration menu:
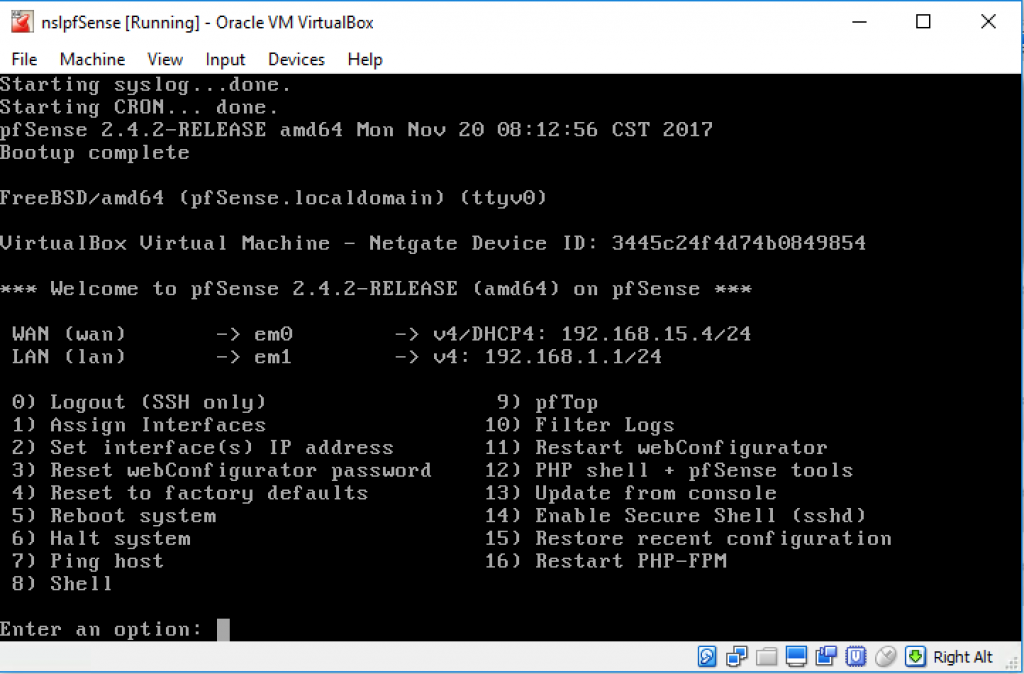
We are going to use this menu to assign the network interfaces and static IP addresses. This step requires knowing what MAC addresses are assigned to the pfSense network interfaces (em0, em1, and em2), as well as the static IP address you want to assign to each interface.
Documenting your interfaces with a table like the one below will help you in this process:
| VirtualBox Network | pfSense Interface | MAC Address | IP Address |
|---|---|---|---|
| nslInternet | em0 | 08:00:27:36:70:56 | 192.168.15.4 |
| VirtualBox Host-Only Ethernet Adapter | em1 | 08:00:27:42:7a:36 | 172.16.1.1 |
| nslInternal | em2 | 08:00:27:ed:b4:1e | 172.16.2.1 |
Of course, your VM will have different MAC addresses. You can create your own table using the MAC address to correlate the first two columns.
Select option “8) Shell” from the pfSense menu and run the following command to get the list of interfaces and MAC addresses for your VM:
$ ifconfig -a | egrep “em|ether”

Then, use the VirtualBox GUI to find the network name that’s linked to each MAC address:
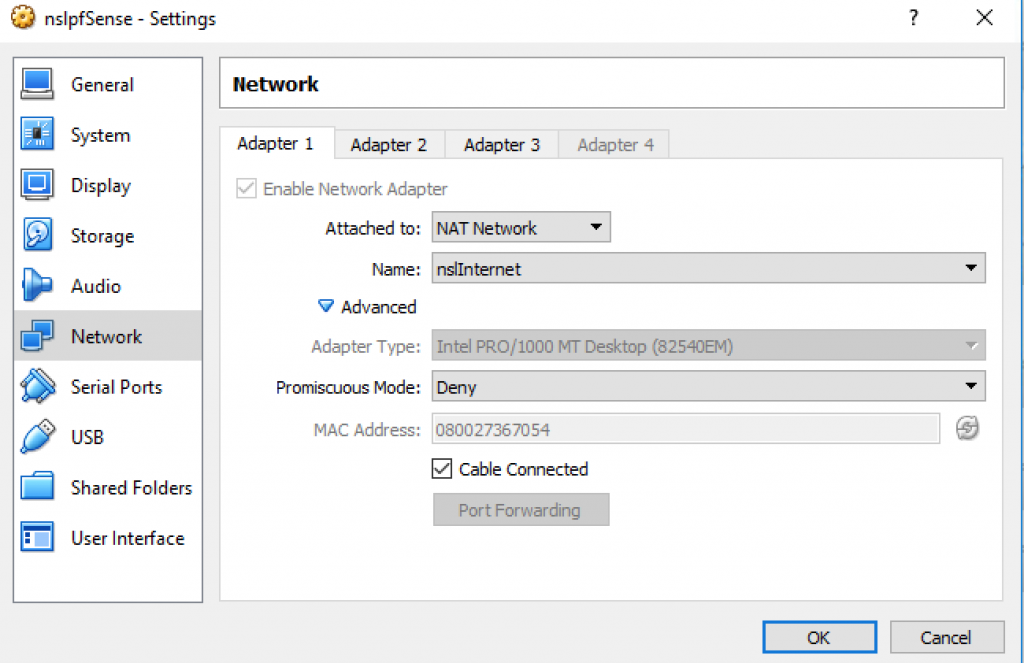
You can now select “1) Assign Interfaces” to assign the network interfaces and “2) Set Interface(s) IP address” to set the network parameters. You’ll have to repeat this step 3 times, one for each network:
WAN - em0
| Configure IPv4 address WAN interface via DHCP? | no |
| Enter the new WAN IPv4 address | 192.168.15.4 |
| Enter the new WAN IPv4 subnet bit count | 24 |
| For a WAN, enter the new WAN IPv4 upstream gateway address | 192.168.15.1 |
| Configure IPv6 address WAN interface via DHCP6? | yes |
| Do you want to revert to HTTP as the webConfigurator protocol? | no |
LAN - em1
| Enter the new LAN IPv4 address | 172.16.1.1 |
| Enter the new LAN IPv4 subnet bit count | 24 |
| Enter the IPv4 upstream gateway address | Leave Blank |
| Enter the new LAN IPv6 address | Leave Blank |
| Do you want to enable the DHCP server on LAN? | yes |
| Enter the start address of the IPv4 client address range | 172.16.1.12 |
| Enter the end address of the IPv4 client address range | 172.16.1.254 |
| Do you want to revert to HTTP as the webConfigurator protocol? | no |
OPT1 - em2
| Enter the new LAN IPv4 address | 172.16.2.1 |
| Enter the new LAN IPv4 subnet bit count | 24 |
| Enter the IPv4 upstream gateway address | Leave Blank |
| Enter the new LAN IPv6 address | Leave Blank |
| Do you want to enable the DHCP server on LAN? | yes |
| Enter the start address of the IPv4 client address range | 172.16.2.12 |
| Enter the end address of the IPv4 client address range | 172.16.2.254 |
| Do you want to revert to HTTP as the webConfigurator protocol? | no |
At the end, your interfaces should look like this:

Configure pfSense
You should now be able to access the pfSense management console from your host machine. Open a browser tab and type the following URL:
https://172.16.1.1
You will be asked for the default credentials (admin/pfsense):

Go through the configuration wizard and do not forget to specify a primary and a secondary DNS servers (in my case I used Google’s DNS as the primary and Layer3’s DNS as secondary):
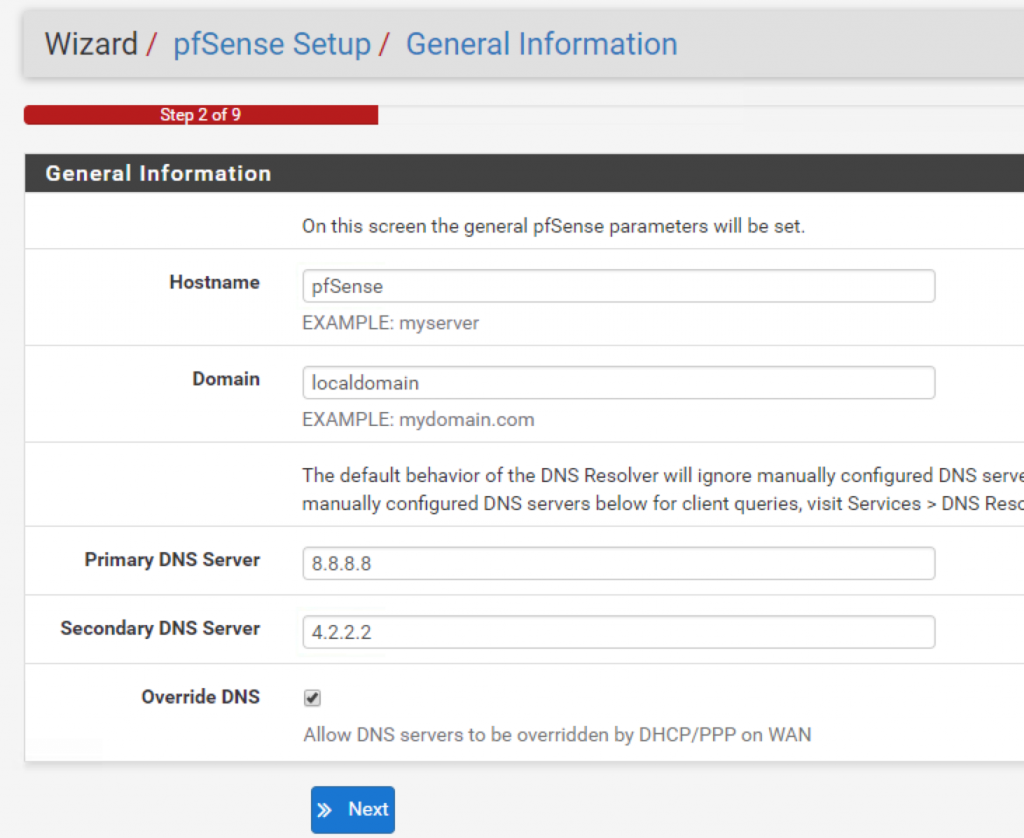
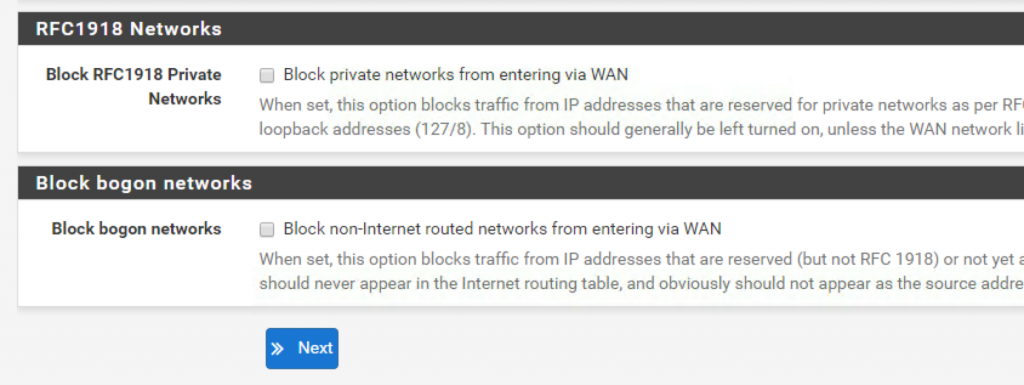
In step 4, uncheck these last two options at the bottom of the page:
After completing the configuration steps, go to System > Advanced and enable SSH access:

You should now be able to SSH into the pfSense VM (172.16.1.1) using your preferred SSH client.
Web Server
As before, feel free to use the following script for creating the VM:
$StorageFolder="D:\VirtualBox Storage"
$ISOFile="D:\ISO\ubuntu-16.04.3-server-amd64.iso"

VBoxManage.exe createvm --name nslWebServer --ostype "Ubuntu_64" --register VBoxManage.exe modifyvm nslWebServer --memory 1024 --cpus 2
VBoxManage.exe createhd --filename "$StorageFolder\nslWebServer\nslWebServer.vdi" --size 20000 --format VDI
VBoxManage.exe storagectl nslWebServer --name "SATA Controller" --add sata
VBoxManage.exe storageattach nslWebServer --storagectl "SATA Controller" --port 0 --device 0 --type hdd --medium "$StorageFolder\nslWebServer\nslWebServer.vdi"
VBoxManage.exe storagectl nslWebServer --name "IDE Controller" --add ide VBoxManage.exe storageattach nslWebServer --storagectl "IDE Controller" --port 1 --device 0 --type dvddrive --medium "$ISOFile"
VBoxManage.exe modifyvm nslWebServer --usb off --mouse ps2 --audio none
VBoxManage.exe modifyvm nslWebServer --nic1 intnet --intnet1 nslInternal
We want our servers to use a static IP address. While you can configure each host manually to use a static IP, we are going to use DHCP mappings and let the router assign the IPs for us.
The web server is attached to the internal (nslInternal) network. Use the VirtualBox GUI to find out its MAC address.
Log in to the pfSense admin interface and go to Services > DHCP Server > OTP1. Scroll all the way to the bottom and add a static DHCP mapping for 172.16.2.2 as shown below:

Start the VM and follow the installation instructions. Power off the VM when the installation is done and run the following clean up commands:
VBoxManage.exe modifyvm nslWebServer --boot1 disk --boot2 none --boot3 none VBoxManage.exe storageattach nslWebServer --storagectl "IDE Controller" --port 1 --device 0 --type dvddrive --medium none VBoxManage.exe storagectl nslWebServer --name "IDE Controller" --remove
Start the VM again and update the packages:
$ sudo apt-get update && apt-get upgrade
Install the SSH server and Apache2:
$ sudo apt-get install openssh-server $ sudo apt-get install apache2
Finally, run the following command to verify the network settings:
$ ifconfig

If you try now to SSH into the server you will get an error. This is because you host doesn’t know how to reach the 172.16.2.0/24 network. To fix that, we need to add a static route to the hypervisor host to tell it to send traffic with destination 172.16.2.* through the pfSense router.
If you are using Windows, run the following command from a command prompt with admin privileges:
route -p add 172.16.2.0 mask 255.255.255.0 172.16.1.1
If you are a Mac user:
sudo route add 172.16.2.0/24 172.16.1.1
For Linux:
route add -net 172.16.2.0 netmask 255.255.255.0 gw 171.16.1.1 dev eth0
*Note: replace eth0 with your interface name.
You should now be able to SSH into the web server using its internal IP (172.16.2.2).
Monitoring Server
Our monitoring server will also be running Ubuntu Server, so the installation process is very similar.
Start by running the following script:
#Create VM
$StorageFolder="D:\VirtualBox Storage"
$ISOFile="D:\ISO\ubuntu-16.04.3-server-amd64.iso"
$HostOnlyNetwork="VirtualBox Host-Only Ethernet Adapter"

VBoxManage.exe createvm --name nslMonServer --ostype "Ubuntu_64" --register
VBoxManage.exe modifyvm nslMonServer --memory 1024 --cpus 2 VBoxManage.exe createhd --filename "$StorageFolder\nslMonServer\nslMonServer.vdi" --size 20000 --format VDI
VBoxManage.exe storagectl nslMonServer --name "SATA Controller" --add sata
VBoxManage.exe storageattach nslMonServer --storagectl "SATA Controller" --port 0 --device 0 --type hdd --medium "$StorageFolder\nslMonServer\nslMonServer.vdi"
VBoxManage.exe storagectl nslMonServer --name "IDE Controller" --add ide
VBoxManage.exe storageattach nslMonServer --storagectl "IDE Controller" --port 1 --device 0 --type dvddrive --medium "$ISOFile"
VBoxManage.exe modifyvm nslMonServer --usb off --mouse ps2 --audio none
VBoxManage.exe modifyvm nslpfSense --nic1 hostonly --hostonlyadapter1 "$HostOnlyNetwork"
VBoxManage.exe modifyvm nslMonServer --nic2 intnet --intnet2 nslInternal
One important difference is that the monitoring server has two NICs instead of just one. The first NIC is attached to the management network (172.16.1.3) while the second NIC is connected to the internal network (172.16.2.3).
Find out what MAC addresses are assigned to each interface. Log in to the pfSense admin interface and go to Services > DHCP Server > OTP1 and add a DHCP mapping for 172.16.2.3:

Then go _Services > DHCP Server > LAN _and add a mapping for the second IP:

Start the VM and follow the installation steps.
Power off the VM and run the clean up commands:
VBoxManage.exe modifyvm nslMonServer --boot1 disk --boot2 none --boot3 none VBoxManage.exe storageattach nslMonServer --storagectl "IDE Controller" --port 1 --device 0 --type dvddrive --medium none VBoxManage.exe storagectl nslMonServer --name "IDE Controller" --remove
Start the VM again, update the software packages and install the SSH server:
$ sudo apt-get update && apt-get upgrade $ sudo apt-get install openssh-server
Run ifconfig to verify the network settings:

At this point you should be able to SSH into the server through the management network interface (172.16.1.3).
Client
Creating the Client VM is not that much different.
#Create VM
$StorageFolder="D:\VirtualBox Storage"
$ISOFile="D:\ISO\ubuntu-16.04.3-desktop-amd64.iso"

VBoxManage.exe createvm --name nslClient --ostype "Ubuntu_64" --register
VBoxManage.exe modifyvm nslClient --memory 1024 --cpus 2
VBoxManage.exe createhd --filename "$StorageFolder\nslClient\nslClient.vdi" --size 20000 --format VDI
VBoxManage.exe storagectl nslClient --name "SATA Controller" --add sata
VBoxManage.exe storageattach nslClient --storagectl "SATA Controller" --port 0 --device 0 --type hdd --medium "$StorageFolder\nslClient\nslClient.vdi"
VBoxManage.exe storagectl nslClient --name "IDE Controller" --add ide
VBoxManage.exe storageattach nslClient --storagectl "IDE Controller" --port 1 --device 0 --type dvddrive --medium "$ISOFile"
VBoxManage.exe modifyvm nslClient --usb off --mouse ps2 --audio none
VBoxManage.exe modifyvm nslClient --nic1 intnet --intnet1 nslInternal
VBoxManage.exe modifyvm nslClient --nic2 natnetwork --nat-network2 nslInternet
Start the VM and follow the Ubuntu Desktop installation instructions.
Power off the VM and run the following clean up commands:
VBoxManage.exe modifyvm nslClient --boot1 disk --boot2 none --boot3 none VBoxManage.exe storageattach nslClient --storagectl "IDE Controller" --port 1 --device 0 --type dvddrive --medium none VBoxManage.exe storagectl nslClient --name "IDE Controller" --remove
Start the VM again and update the software packages:
$ sudo apt-get update && apt-get upgrade
* You don’t need to install an SSH server this time.
Open up a terminal window and verify the network settings (ifconfig -a):

We see two network interfaces but only one is active (enp0s3). You might be wondering, why do we need a second NIC? Because we want to be able to hop between the Internal and External networks without having to create a separate VM.
First, we need to make some edits to /etc/network/interfaces:
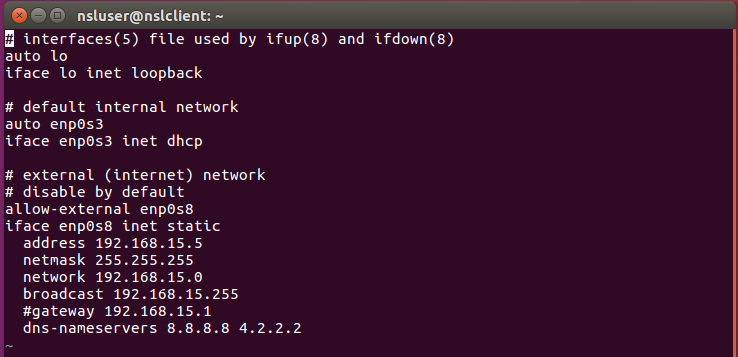
If you want the client to be in the internal network:
$ sudo ifdown enp0s8 $ sudo ifup enp0s3
To switch to the external network:
$ sudo ifdown enp0s3 $ sudo ifup enp0s8
And that’s it…for now
You’ve made it! You now have a fully fledged virtual environment running. In the next post we will learn how to configure pfSense to provide basic services to our network such as DNS, or NTP.
Stay tuned!