OpenAM12 Custom Authentication Chains
One of the cool features of JAAS (Java Authentication and Authorization Service), which is at the core of OpenAM’s authentication engine, is that it’s modular. Not only you can create your own authentication modules but you can also chain multiple modules together in a cascade fashion. This comes in handy when you want to implement some sort of strong authentication, such as 2-factor authentication flow, where you need to force the user to go through multiple authentication steps.
In this blog post I will explain how OpenAM Authentication Chaining works. I will be using couple of sample authentication modules throughout the post. You can find all the code here.
Setting Up an Authentication Chain
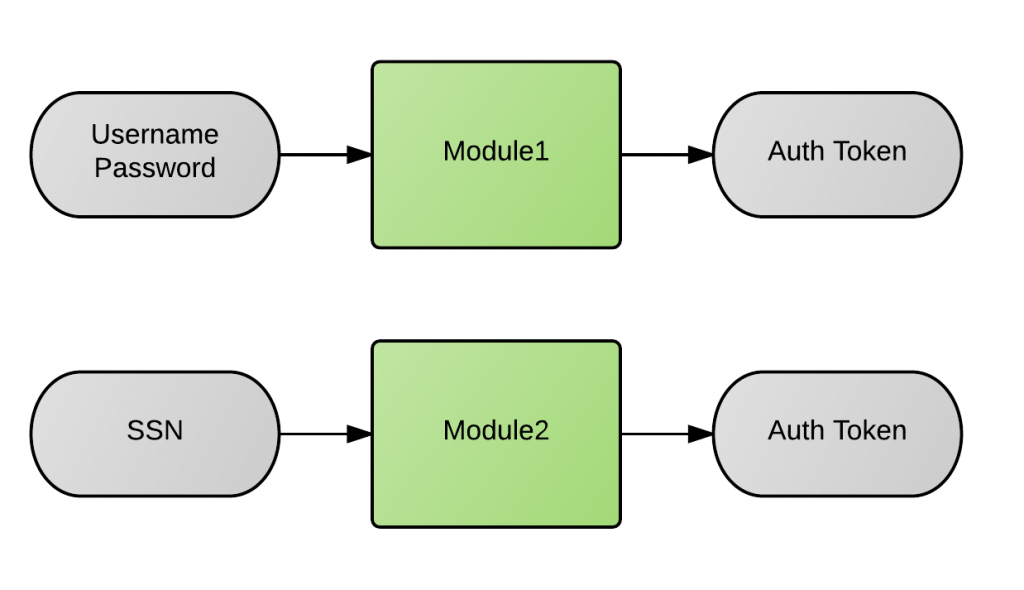
Let’s assume that we have two custom authentication modules:
- Module1 validates a username and password combination.
- Module2 validates the user’s Social Security Number (SSN).
Both modules can be represented independently as follows:
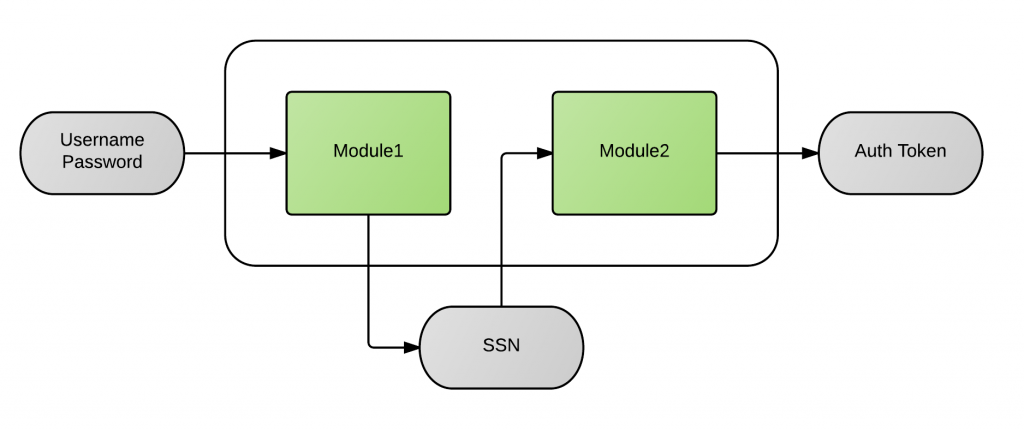
As you can see, Module2 only asks for the SSN so you might be wondering, where does it get the username (or some other user identifier) from? I’ll explain how that can be done a little later but for now let’s just focus on how we can chain these two modules together so that the authentication flow looks like this instead:
First, we need to create an authentication service:
$ ssoadm create-auth-cfg -u amadmin -f admin.pwd --name sampleService --realm /
Then, we’ll add both modules (in order) to the chain:
$ ssoadm add-auth-cfg-entr -u amadmin -f admin.pwd --name sampleService --realm / --modulename Module1 --criteria REQUISITE --position 0 $ ssoadm add-auth-cfg-entr -u amadmin -f admin.pwd --name sampleService --realm / --modulename Module2 --criteria REQUIRED --position 1
After running the ssoadm commands you can verify that the authentication chain shows up under Authentication > Authentication Chaining. Click on the chain name (sampleService) to see the details. You should see a table with the following columns: Instance (name of the auth module), Criteria, and Options (explained at the end of the post).
The criteria flags establish the enforcement criteria for the module instance within a chain:
- REQUISITE : successful authentication to this module instance is required for the authentication process to succeed. If authentication to this module fails the chain is broken and the authentication process fails.
- REQUIRED : successful authentication to this module instance is required for the authentication process to succeed. If authentication to this module fails the authentication process will continue to the next module.
- SUFFICIENT : successful authentication to this module is not required but, if authentication does succeed, the user is authenticated and the authentication process will not continue through the authentication chain.
- OPTIONAL : successful authentication to this module instance is not required but, whether it succeeds or fails, the authentication process continues through the module instances in the authentication chain.
Go here if you want to know more about these policies.
Authentication Process
Going back to our example, we want to make sure that authentication fails right away if the username/password combination is invalid. That’s why we marked Module1 as REQUISITE. Since Module2 is the last module in the chain, it doesn’t really matter whether you mark it as REQUIRED or REQUISITE. We chose the first option.
Let’s see what the authentication process looks like now:
Step1: First we need to initialize the service. The response will contain the list of callbacks required by the first module in the chain. The authId field is a JWT token that uniquely identifies the authentication context, and so must also be sent back in every subsequent request. I am omitting the full value for lack of space.
curl -k --request POST \ --header "Content-Type: application/json" \ "https://openam.groman.com:8443/openam/json/authenticate?authIndexType=service&authIndexValue=sampleService" { "authId": "eyAid...GDYaEQ", "template": "", "stage": "Module11", "header": "Using Module1", "callbacks": [{ "type": "NameCallback", "output": [ { "name": "prompt", "value": "Username" }], "input": [{ "name": "IDToken1", "value": "" }] }, { "type": "PasswordCallback", "output": [{ "name": "prompt", "value": "Password" }], "input": [{ "name": "IDToken2", "value": "" }] } ] }
Step2: In this step we need to fill in the callback values with the right credentials and submit them back to the server.
curl -k --request POST \ --header "Content-Type: application/json" \ --data @auth\_request\_1.json \ "https://openam.groman.com:8443/openam/json/authenticate?authIndexType=service&authIndexValue=sampleService" { "authId": "eyAid...GDYaEQ", "template": "", "stage": "Module21", "header": "Using Module2", "callbacks": [{ "type": "NameCallback", "output": [ { "name": "prompt", "value": "SSN" }], "input": [{ "name": "IDToken1", "value": "" }] } ] }
Notice that we are passing the request data in a file (auth_request_1.json):
{ "authId": "eyAid...GDYaEQ", "template": "", "stage": "Module11", "header": "Using Module1", "callbacks": [{ "type": "NameCallback", "output": [ { "name": "prompt", "value": "Username" }], "input": [{ "name": "IDToken1", "value": "demo" }] }, { "type": "PasswordCallback", "output": [{ "name": "prompt", "value": "Password" }], "input": [{ "name": "IDToken2", "value": "changeit" }] } ] }
Step3: Once again we need to fill in the callback value (SSN) and send it back to the server. This time the response will contain the authentication token (tokenId) and the user is now logged in.
curl -k --request POST \ --header "Content-Type: application/json" \ --data @auth\_request\_2.json \ "https://openam.groman.com:8443/openam/json/authenticate?authIndexType=service&authIndexValue=sampleService" {"tokenId":"AQIC5wM...xODQ5\*","successUrl":"/sso/console"}
The contents of the second JSON data file are shown below:
{ "authId": "eyAid...GDYaEQ", "template": "", "stage": "Module21", "header": "Using Module2", "callbacks": [{ "type": "NameCallback", "output": [ { "name": "prompt", "value": "SSN" }], "input": [{ "name": "IDToken1", "value": "111223333" }] } ] }
Data Sharing
The last topic I wanted to cover today is data sharing between modules. How can authentication modules share data (credentials for example) when they are part of the same authentication chain? The answer is through a data structure called Shared State. The Shared State is just a Map that gets passed to the authentication module when it’s initialized.
Each module has to override the init() method whose list of parameters includes the Shared State:
@Override public void init(Subject subject, Map sharedState, Map options) { //Do something }
The important thing to notice is that, as the name implies, the Shared State map will be shared between all the modules in the chain. So this means that Module1 could add an entry to the map:
sharedState.put("MyKey", "MyValue");
And Module2 could retrieve it later:
String someValue = sharedState.get("MyKey");
This is specially useful when you need to share credentials between modules. In our example, Module2 needs to know who the user is before validating the SSN, but instead of asking for the username again it assumes that the username/password credentials have been authenticated already (by Module1 for example) and it expects to find them in the Shared State.
If you look closely at the init() method inside Module2 you’ll see how the username is retrieved from the map:
username = (String) sharedState.get(ISAuthConstants.SHARED\_STATE\_USERNAME);
So what happens if Module2 can’t find the username in the Shared State? Authentication will fail of course. That’s because Module2 was specially designed to always be preceded by another module in the chain. This is also the case with other multi-factor authentication modules such as HOTP, or OATH that are not supposed to be used as stand-alone authentication modules.
Shared State Options
Even though there is nothing preventing you from using the Shared State freely in you custom authentication modules, if you want to play by the rules (the JAAS rules that is) we need to talk about the _Authentication Chaining Options. _The following options are available:
- iplanet-am-auth-store-shared-state-enabled (true or false): if set to true the authentication module is allowed to stored credentials in the Shared State. The default value is true.
- iplanet-am-auth-shared-state-enabled (true or false): if set to true the authentication module will try to validate the credentials from the Shared State before asking the user. In order to accomplish this task OpenAM will automatically invoke the module’s process() method with an empty callbacks array. The default value is false.
- iplanet-am-auth-shared-state-behavior-pattern (tryFirstPass or useFirstPass): determines how the authentication module should behave when iplanet-am-auth-shared-state-enabled is set to true. “tryFirstPass” (default value) means that the module should try to validate the credentials from the Shared State and then display the login page if the credentials are either not found or invalid. On the other hand, if this property is set to “useFirstPass” the module should fail if the credentials are invalid.
You can see how Module1 checks for iplanet-am-auth-store-shared-state-enabled before storing anything in the Shared State map:
private void storeInSharedState(String key, String value) { //Make sure store of credentials is enabled if (!storedCredentials) return; if (debug.messageEnabled()) { debug.message("Storing "+ key + " in Shared State"); } if (sharedState != null) { sharedState.put(key, value); } }
Let’s assume we want Module2 to look for the SSN in the Shared State before prompting the user. If a valid SSN is found in the map Module2 will silently logged the user in. How can we do this?
First, we need to make sure that Module1 stores the SSN in the Shared State:
storeInSharedState(SSN\_KEY, SSN\_VALUE);
Then, Module2 should look for the SSN in the Shared State map if the callbacks array is null:
if ((callbacks == null || callbacks.length == 0) && sharedStateEnabled) { debug.message("Callbacks are empty. Trying with SharedState"); ssn = (String) sharedState.get(SSN\_KEY); }
Finally, we need to set iplanet-am-auth-shared-state-enabled to true so that Module2’s process() gets invokes (first pass) before the response gets sent to the client.
With these changes in place this is what the authentication process looks like:
Step1: initialize module and get required callbacks (nothing has changed here)
Step2: submit the username and password and…that’s it! we are logged in!
curl -k --request POST \ --header "Content-Type: application/json" \ --data @auth\_request\_1.json \ "https://openam.indigoconsulting.com:8443/openam/json/authenticate?authIndexType=service&authIndexValue=sampleService" {"tokenId":"AQIC5wM...xODQ5\*","successUrl":"/sso/console"}
Behind the scenes what happened was that Module2 got invoked right away, found the SSN in the Shared State, and returned a success response.
I hope this example gives you an idea of the potential that comes with using authentication chains. It’s a great way of encapsulating your authentication logic but always make sure to use this technique judiciously.