Tomcat HA Cluster Automation using Ansible
For the last couple of weeks I've been playing with Ansible, a very powerful automation tool that lets you configure, and deploy applications to multiple remote servers with a single command.
Sounds easy, right? The answer is yes...but only after you get ansible to a point where it does what you want it to do. In this post I will explain how to use ansible to install a cluster of Tomcat 7 containers balanced by an HAProxy. I want to make clear that the purpose of this post is not to explain how ansible works. You should first take a look at the ansible documentation to get familiar with the basic commands a configuration files we'll be using for this project.
The following diagram illustrates the system that we are trying to build:
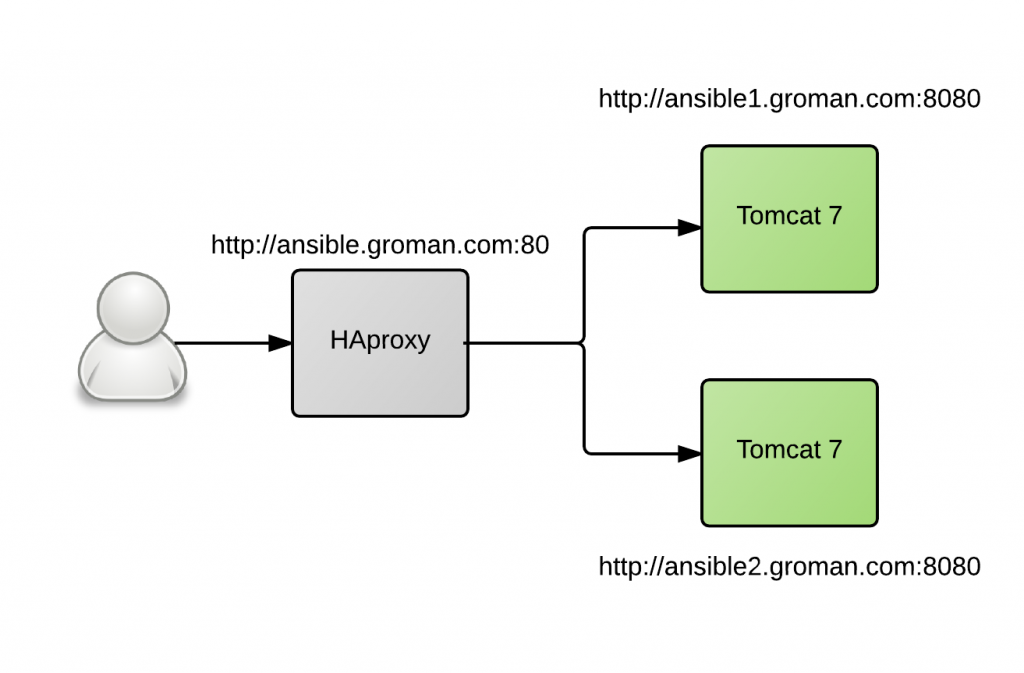
We'll be using HAProxy as our load balancer and two Tomcat 7 servers as our application containers. For testing purposes, we will deploy a very simple application called "snoop" that will just display a bunch of request attributes.
You can download the ansible project from here. Let's take a look at what's inside the project.
The "hosts" file, also called the "inventory" file, contains a list of hostnames for the Tomcat servers and the load balancer.
[tomcat-servers]
ansible1.groman.com
ansible2.groman.com

[lbservers]
ansible.groman.com
Even though I will only use two application containers and one proxy for this example you can add as many servers as you want to either group.
The sites.yml file, also known as the "playbook" file, contains two plays, one for the Tomcat servers and another one for the load balancer:
---
- hosts: tomcat-servers remote\_user: root roles: - selinux - tomcat - webapp - hosts: lbservers remote\_user: root roles: - selinux - haproxy

I will briefly explain what each role does:

- selinux: installs the Linux kernel security module. Notice that this role is used in both plays.
- tomcat: installs and configures Tomcat 7 under "/usr/shared/tomcat".
- webapp: deploys the snoop application to the tomcat servers.
- haproxy: installs and configures an HAProxy server. The HAProxy configuration file can be found in "/etc/haproxy".

Feel free to explore the roles folder if you want to know more about the individual tasks involved.

Before running the playbook make sure you have ansible 1.2 or higher installed in your host machine (i.e. the machine where you are running the playbook from). Luckily, i[nstalling ansible](http://docs.ansible.com/ansible/intro_installation.html) is pretty straight forward.

Once you have ansible installed you should add your own hostnames to the "inventory" file and modify the two configuration files located in the "group\_vars" folder with your own environment properties such as port numbers, admin credentials, etc...

The installation has only been tested in CentOS 6.X and 7.X though it should be pretty easy to extrapolate this playbook to other Linux environments such as Fedora or Ubuntu.

Notice that by default ansible will try to connect to your remote machines via ssh and login as the "root" user without specifying any password. It expects your remote hosts to be pre-provisioned with your ssh public key. You can read more about this topic [here](http://docs.ansible.com/ansible/intro_getting_started.html#remote-connection-information). Run the following command to make sure ansible can connect to all the remote servers:

```
ansible all -m ping -i hosts
```

Once ansible can establish a secure connection you can execute the playbook by running the following command:

```
ansible-playbook -i hosts site.yml
```

Just hit enter and see the magic happen! Once the installation is complete you should be able to hit the load balancer and see the snoop page. HAProxy runs on port 80 by default, so in my environment this URL looks like this:

_http://ansible.groman.com/snoop_

In my next post I will explain how to integrate Ansible with [Vagrant](https://www.vagrantup.com/) . Stay tuned!

Do you think the project can be improved? Feel free to leave a comment with your feedback!