Follow up: Tomcat HA Cluster Automation using Ansible and Vagrant
In one of my previous posts I presented a solution to automate a Tomcat cluster installation using Ansible. One of the assumptions I made at the time was that the actual machines (physical or virtual) were already running and that Ansible could access them via SSH. Well, that might be true for a real production-like environment but what if you wanted to test this out on your local machine? Wouldn’t it be cool to spin up some virtual machines first and then use Ansible to provision them with the click of a button? Vagrant to the rescue!
Vagrant’s motto is “Development environments made easy” and in this post I plan to prove that and show how we can improve our existing sample project. I am not going to spend time going through the installation steps since I believe the official Vagrant installation guide is pretty clear already.
The code for the sample project can be downloaded from here.
Prerequisites
To be able to run the project you’ll need to install the following software:
* This is needed since Vagrant doesn’t provide the virtualization environment. Vagrant also supports other virtualization providers such as VMWare or AWS but VirtualBox is the default free option…and we like free. You can read more about virtualization providers here.
Project Goal
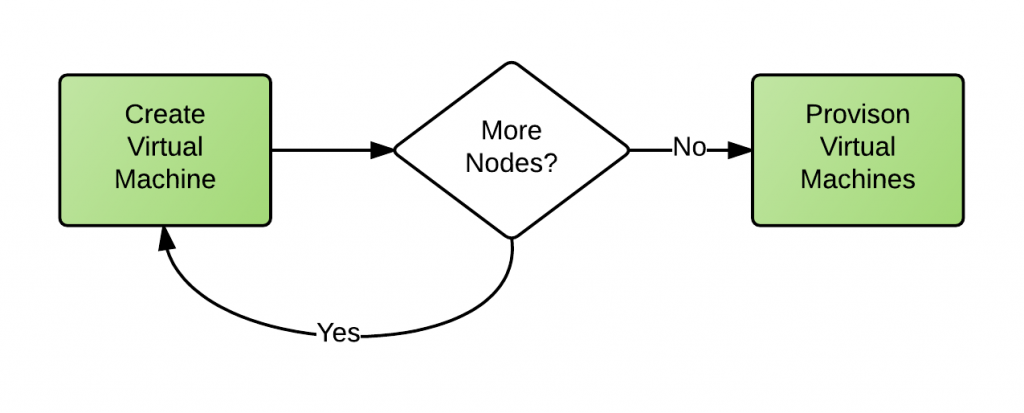
Before we dive into the sample project let me give you a high level overview of what our goal is. In a nutshell, we want to use Vagrant to spin up a bunch of virtual machines and then run an Ansible playbook to provision the VMs with the software we want.
We only need three VMs in our case: two for the Tomcat containers and another one for the HAProxy.
The sequence of events will look like this:
Sample Project
If you download the project you will see that the only major addition is a new folder called “vagrant” that contains two files: Vagrantfile and nodes.json.
If you are already familiar with the standard Vagrant configuration you will know that all the meta-data is kept in a file called Vagrantfile. Our Vagrantfile looks like this:
#Parse nodes config file nodes = (JSON.parse(File.read("nodes.json"))) # Vagrantfile API/syntax version. Don't touch unless you know what you're doing! VAGRANTFILE\_API\_VERSION = "2" Vagrant.configure(VAGRANTFILE\_API\_VERSION) do |config| config.vm.box = "centos/7" nodes.each\_with\_index do |node, node\_index| node\_name = node[':node\_name'] # name of node config.vm.define node\_name do |config| #Use default SSH private key for every node config.ssh.insert\_key = false config.vm.hostname = node[':hostname'] config.vm.network :private\_network, ip: node[':ip'] config.vm.provider :virtualbox do |vb| vb.customize ["modifyvm", :id, "--memory", node[':memory']] vb.customize ["modifyvm", :id, "--name", node\_name] end #Run provisioner at the end, when all nodes are up if node\_index == (nodes.size - 1) config.vm.provision "ansible" do |ansible| ansible.limit = "all" ansible.playbook = "../site.yml" ansible.inventory\_path = "../hosts" #Disable host key checking so that the hosts don't get added to #our known\_hosts file ansible.host\_key\_checking = false end end end end end
The first thing you’ll notice is that it creates multiple virtual machines based on the contents of another file called nodes.json. Why bother creating another file? The idea is that you can keep all the VM specific settings such as the VM name, IP Address, hostname, and memory capacity into the json file whereas the Vagrantfile remains pretty much static, even if you decide to add more VMs later on. It also provides and easier way of reading and managing your VM settings. This is what my nodes.json file looks like:
[{ ":node\_name": "ansible", ":ip": "192.168.82.2", ":hostname": "ansible.groman.com", ":memory": 512 }, { ":node\_name": "ansible1", ":ip": "192.168.82.3", ":hostname": "ansible1.groman.com", ":memory": 1024 }, { ":node\_name": "ansible2", ":ip": "192.168.82.4", ":hostname": "ansible1.groman.com", ":memory": 1024 }]
We also prevent Vagrant from automatically generating a new random SSH key pair for each VM. Instead we make sure that Vagrant provisions the VMs with the same default SSH public key. This would make things a little easier for us since we can use the same key to connect to all the VMs. The default private key is located inside you vagrant.d directory and it’s called “insecure_private_key”. In a Unix-like system the default location should be:
~/.vagrant.d/insecure\_private\_key
As you can probably imagine this key should never be used in a real environment (in which case you should use you own key pairs) but it will do the trick for a development environment like the one we are trying to build.
You might also notice that Vagrant will assign a set of private static IPs to our VMs so that we can easily access them just like if they were running on a remote location. Now it’s a good time to edit your hosts file and map those IP addresses to the corresponding FQDNs as defined in our Ansible’s host file:
192.168.82.2 ansible ansible.groman.com 192.168.82.3 ansible1 ansible1.groman.com 192.168.82.4 ansible2 ansible2.groman.com
Vagrant will then run the Ansible playbook after all the VMs are functioning. Sometimes you can chose to provision the VMs one at a time but our current playbook requires us to run it only after all the VMs are up.
And that’s it! Just run the following command from inside the vagrant folder to create and provision your VMs:
vagrant up
The process might take some time to finish but at the end you should be able to access you application by going to this url:
http://ansible.groman.com/snoop
Feel free to ask questions and leave some feedback.
Happy automation!